
Perfect Crispy Baked Buffalo Wings (No Breading Required)
Getting restaurant-quality crispy baked Buffalo wings at home feels impossible when you’re staring at soggy, rubbery wings straight from your oven.
I’ve been there too many times – spending money on wings that taste like disappointment while wondering why my kitchen can’t compete with my favorite wing joint.
The game-changer? Baking powder.
Not baking soda (that’ll make your wings taste like soap), but actual baking powder that transforms ordinary chicken wings into crispy perfection without a single breadcrumb.

KEY INFO
Prep time: 15 minutes
Cook time: 50 minutes
Total time: 65 minutes
Servings: 4-6 people
Difficulty level: Easy
Dietary tags: Gluten-free, Keto, Paleo (with modifications)
EQUIPMENT NEEDED
- Large mixing bowl
- Rimmed baking sheet
- Wire rack (this is crucial – don’t skip it)
- Paper towels
- Small saucepan
- Tongs
Simple alternatives:
No wire rack? Use a parchment-lined baking sheet and flip wings halfway through cooking.
INGREDIENTS
For the Wings:
- 2 lbs chicken wings (2 lbs / 900g), separated into flats and drums
- 1 Tbsp baking powder (15ml) – NOT baking soda
- 1 tsp kosher salt (5ml)
- 1/2 tsp black pepper (2.5ml)
- 1/2 tsp garlic powder (2.5ml) [optional]
For Buffalo Sauce:
- 1/3 cup Buffalo hot sauce (80ml) – Frank’s RedHot works perfectly
- 2 Tbsp unsalted butter (30g) [or ghee for Paleo]
- 1 tsp brown sugar (5ml) [optional, for milder heat]
For Serving:
- Blue cheese dressing
- Celery sticks
- Chopped green onions

METHOD
- Preheat your oven to 250°F (120°C).
- Pat wings completely dry with paper towels.
This step determines your success – wet wings = soggy wings. - Toss wings with baking powder, salt, pepper, and garlic powder in a large bowl.
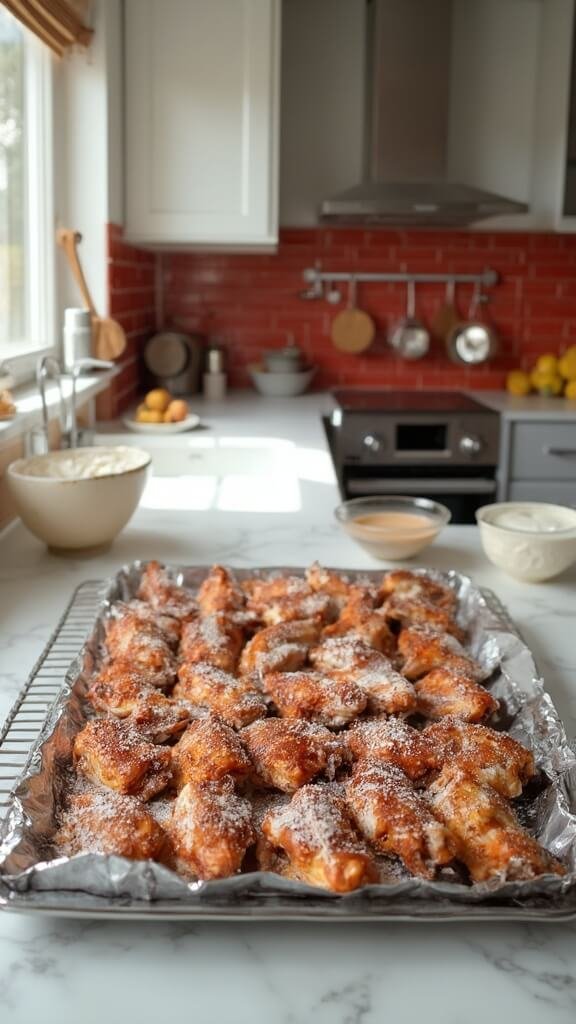
Make sure every wing gets coated evenly. - Arrange wings on wire rack over foil-lined baking sheet.
Space them out – crowded wings steam instead of crisp.
- Bake for 30 minutes at 250°F.
- Increase temperature to 425°F (220°C) without removing wings.
Bake another 40-45 minutes until golden brown and crispy. - Make Buffalo sauce while wings finish cooking.
Melt butter in small saucepan, whisk in hot sauce and brown sugar.

- Let wings rest for 5 minutes after removing from oven.
This sets the crispiness. - Toss wings in Buffalo sauce and serve immediately.

CRUCIAL TIPS
- Internal temperature should reach 165°F (74°C)
- Wings are done when skin is golden brown and visibly crispy
- Juices run clear when pierced with a fork
- Edges will curl slightly and wings shrink when fully cooked
Storage:
Store leftover wings in refrigerator for up to 3 days.
Reheating:
Place on wire rack in 400°F oven for 8-10 minutes to restore crispiness.
Scaling:
Double recipe easily, but use multiple baking sheets to avoid overcrowding.
Common Mistakes to Avoid:
- Using baking soda instead of baking powder (bitter taste)
- Skipping the wire rack (leads to soggy bottoms)
- Not drying wings thoroughly
- Overcrowding the pan
Variations:
- Extra Spicy: Add 1/4 tsp cayenne to dry seasoning
- Smoky: Replace regular paprika with smoked paprika
- Honey Buffalo: Add 1 Tbsp honey to sauce
- Dry Rub: Skip the sauce, double the seasonings
The two-temperature method might seem fussy, but it’s the secret that separates amateur wings from pro-level results.
That initial low heat gently renders the fat while the high heat creates the crispy skin you’re craving.
Your guests won’t believe these came from a regular home oven.