KEY INFO
Prep time: 20 minutes
Cook time: 30 minutes
Total time: 50 minutes
Servings: 4-6
Difficulty level: Moderate
Dietary tags: Gluten-free, Low-carb, Keto-friendly, High-protein

EQUIPMENT NEEDED
Essential tools:
- Large baking sheet
- Parchment paper (crucial for cheese wraps)
- 2 mixing bowls
- Nonstick skillet
- Wide spatula
- Sharp knife
Simple alternatives:
- Silicone baking mats instead of parchment
- Electric griddle for crisping (makes it easier)
- Oven broiler if you don’t have a skillet
INGREDIENTS
For the cheese wraps:
- 16-20 slices provolone cheese (340g/12oz) [cheddar or mozzarella work too]
- Cooking spray
For the filling:
- 3 cups cooked chicken, shredded (450g/1lb) [rotisserie saves time]
- 1½ cups enchilada sauce, divided (360ml/12 fl oz)
- 1 cup Mexican cheese blend, shredded (113g/4oz)
- 1 can black beans, drained (400g/14oz) [skip for strict keto]
- 1 can green chiles, drained (113g/4oz)
- 2 tablespoons lime juice (30ml/1 fl oz)
- 1 teaspoon ground cumin
- 1 teaspoon chili powder
- ½ teaspoon garlic powder
- Salt and pepper to taste
For serving:
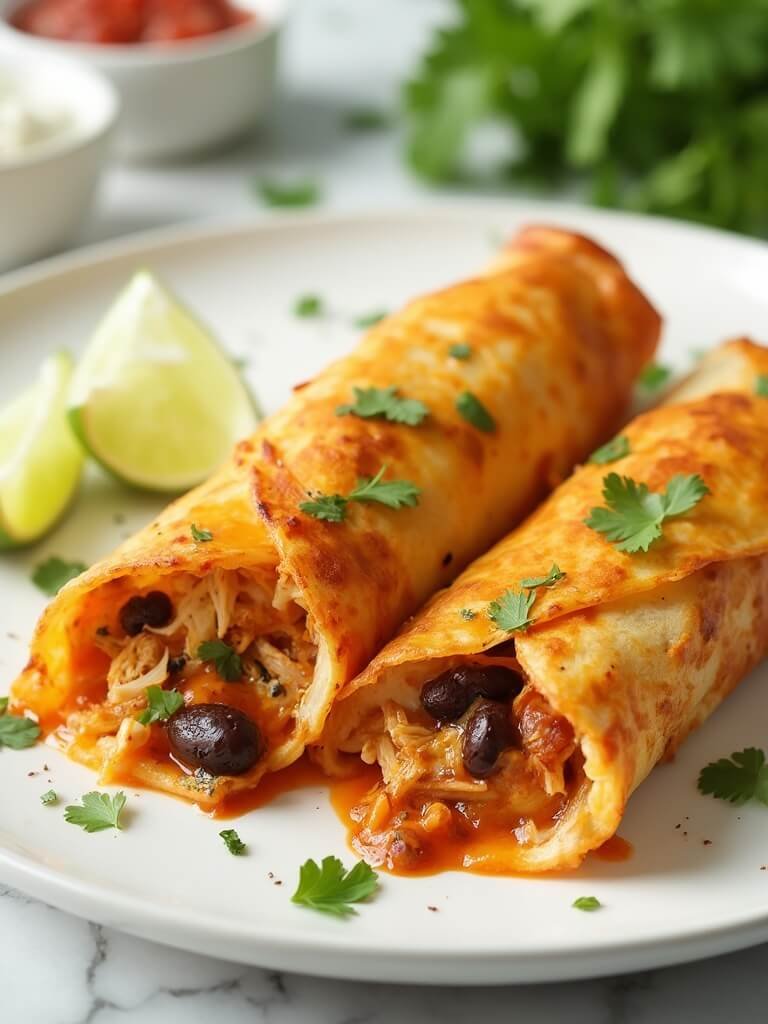
- Fresh cilantro, chopped
- Sour cream
- Salsa
- Sliced jalapeños

METHOD
1. Make the cheese wraps first
Preheat your oven to 350°F (177°C).
Line your baking sheet with parchment paper. Arrange 4-5 cheese slices in a rectangle, overlapping edges slightly. You want them touching so they fuse together.
Repeat to make 4 separate cheese rectangles on the sheet.
Bake for 10-12 minutes until edges are golden brown and cheese has melted into one flexible sheet. Don’t walk away – burnt cheese tastes terrible and won’t bend.
2. Cool the wraps correctly
Let cheese wraps cool for 3-4 minutes only. They need to be firm enough to handle but still pliable. Too long and they’ll crack when you fold them.
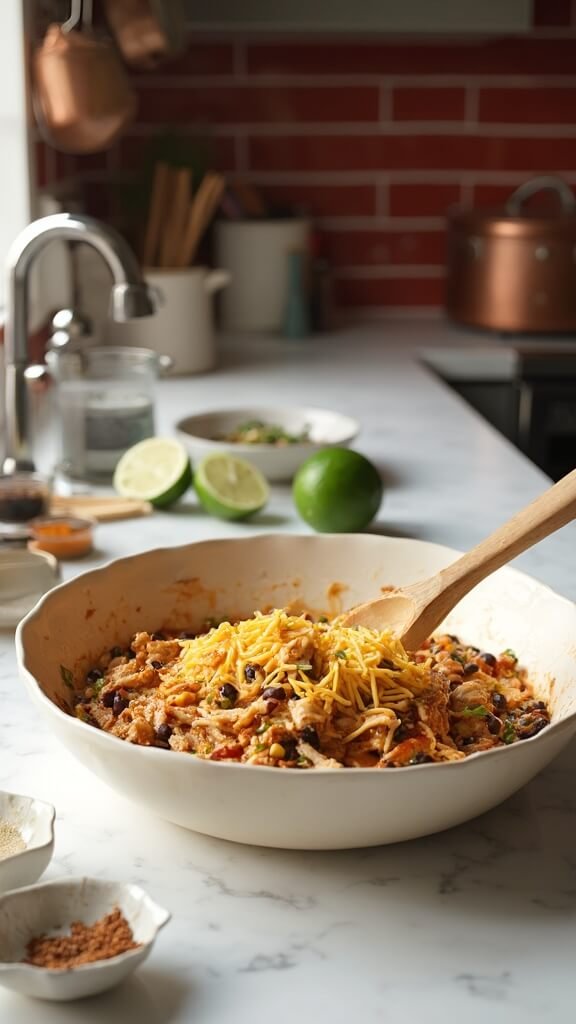
3. Mix your filling
While cheese cools, combine chicken, 1 cup enchilada sauce, shredded cheese, black beans, green chiles, and all spices in a large bowl.
Taste and adjust salt – rotisserie chicken can be salty already. Add lime juice last to brighten everything up.
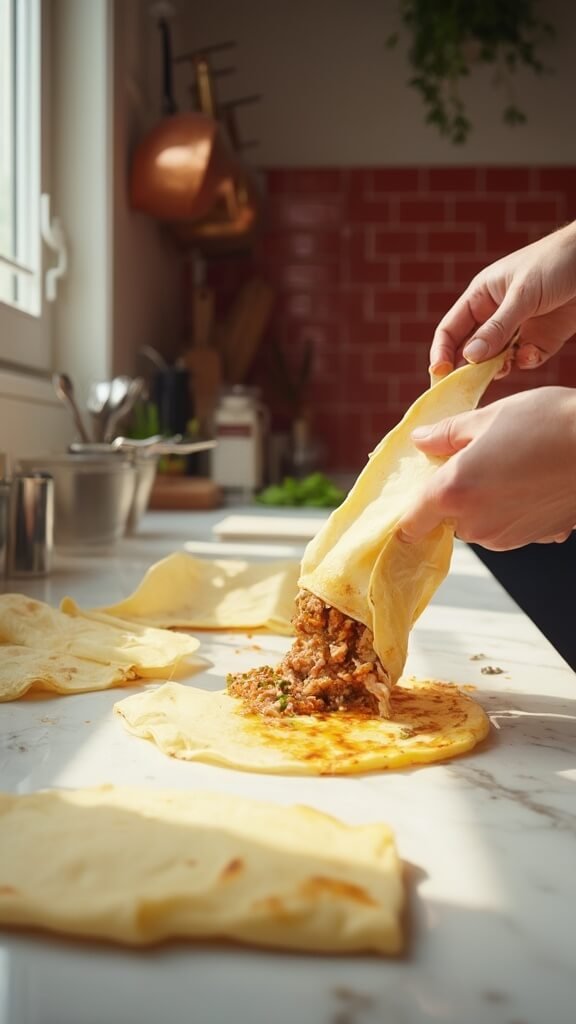
4. Assemble like a pro
Place each cheese wrap on a flat surface. Spoon ⅓ cup filling down the center, leaving 2 inches at each end.
Fold the short ends over the filling first. Then roll from one long side to the other, keeping it snug but not tight. Press the seam gently to seal.
5. Crisp to perfection
Heat your skillet over medium heat. Spray lightly with cooking oil.
Place wraps seam-side down. Cook 2-3 minutes until golden and crispy. Flip carefully and cook another 2-3 minutes.
You’ll hear gentle sizzling – that’s good. Loud popping means your heat’s too high.
CRUCIAL TIPS
- Don’t overbake cheese wraps – golden edges, not brown centers
- Work fast during assembly – cheese wraps stiffen quickly
- Keep filling chunks small – big pieces tear the cheese
- Press gently when rolling – too much pressure creates cracks
- Medium heat only – high heat burns cheese before filling warms

STORAGE & VARIATIONS
Storage:
Refrigerate cooked enchiladas up to 3 days. Reheat in oven at 350°F for 10 minutes – skip the microwave unless you love soggy cheese.
Scaling up:
Double everything except bake cheese wraps in batches. They don’t stack well and need individual attention.
Common mistakes:
- Letting cheese wraps get too cool (they crack)
- Overfilling (creates messy leaks)
- Using wet ingredients (makes cheese soggy)
Killer variations:
- White sauce version: Replace red enchilada sauce with sour cream and green chiles
- Spicy kick: Add chipotle peppers to filling
- Veggie power: Swap chicken for sautéed mushrooms and bell peppers
- Extra crispy: Brush assembled wraps with beaten egg before final cooking
These cheese wraps changed my entire approach to low-carb Mexican food. The texture isn’t exactly like flour tortillas – it’s actually better. Richer, more satisfying, and they hold together beautifully.
Your biggest challenge will be not eating the cheese wraps straight from the oven. I’ve definitely been guilty of that more than once.